The fish canvas project was a good simple project to share because it used a limited number of images and used a black and white image with a colored image.
I figured I'd post a few tips on how I create and layer the images in Photoshop Elements and MS Publisher. I had a heck of a time figuring this out, so hopefully it helps someone out there.
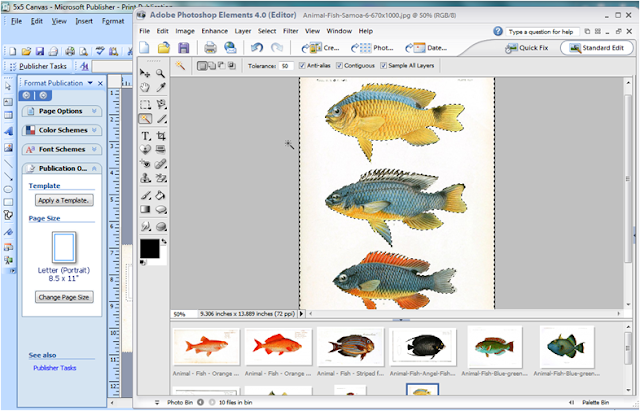
{1} Open Photoshop Elements. Click File > Open and select your copyright free image {shown below}.
{2} For Adobe Photoshop Elements users, use the magic wand tool {the one with the yellow star at the end of the wand} to select the white background aka what you want to get rid of. {Tip: if the graphic has a pretty distinct colored background, a tolerance of 50 usually works for me. I check the anti-alias, contiguous, and sample all layers buttons as shown below. If you have a background that isn't as distinct or a patterned background, you'll need to play with these levels, or else you may be selecting too much or too little of what you want}. The only difference between this image and the one above is that this image has dotted lines around the fish, showing that the white background is selected.
{3} Lots of steps in this one, so pay close attention..I then go to Select > Inverse {to select the fish now since that's what I'm interested in}. I then go to File > Copy {which puts the colored fish portion on your clipboard}, then File > Paste > New Document {to start a new document with just my colored fish}. When the new document pop up box comes up {see below}, you're going to want to make sure "Background Contents" at the bottom is set to "Transparent".

{4} Here is what your new file will look like. You have just pasted the image part that you want in to a new file and the background is clear which means you can now layer images as you please...but only if you do a few more things, so keep following along...
{5} OPTIONAL: It's a little tough to find projects where I'm going to want all three fish in this plate together. So to increase my options for layouts, I break apart plates that have multiple images in each scan, and save them separately. Using the crop tool, select the fish you want and crop close to it. Click the green check mark when you're ready. Your file will now just show the one fish with a transparent background {sorry no picture of a single fish}.
{6} It's important that you save your new file as one that is compatible with transparency. At this point, if you save your painstakingly created transparent image file as a .jpg or .bmp, you're going to end up with a white background. So, go to File > Save As. Choose a file name, and then in the drop down, select .PNG. This file format will preserve your transparent background.
{7} Repeat this process for all graphics you want to use in your project. Now open your graphics editing program {I like MS Publisher for some reason, maybe because I'm not an Adobe Photoshop Elements expert}. Insert all the images you want to use and begin moving them around on the page, on top of each other {use the "bring to front" option to get an image in front of another one}, etc. Don't forget that images look really nice and more realistic if some graphics are half on/half off the page.
Here is a really simple two image layering I did for the fish canvas project. I put the script graphic in the back and centered my transparent fish graphic on top. The finished fish canvases are back at the top of this post.
I know there are probably better ways to create these images and better software, but this is how I do it, using cobbled together instructions from the Internet and some of my trial and error techniques. If you have any tips, please leave me a comment!


I just want to mention that MS Word 2010 has amazing features where you can remove backgrounds with the click of a button! You can recolor too (b/w or any color you can imagine!) too. I accidentally discovered this and was able to create a collage so easily by changing transparency too all in WORD! Hope others can use this tip.
ReplyDeleteHow come all of the pictures are missing on your image transfer DIY coaster page. In fact, alot of images are gone from your blog.
ReplyDelete